Tech Tips & Information
Replacing a GX160 Conrod
|
Tech Tips & Information |
Replacing a GX160 Conrod
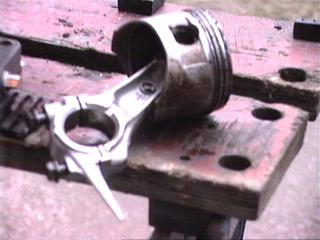
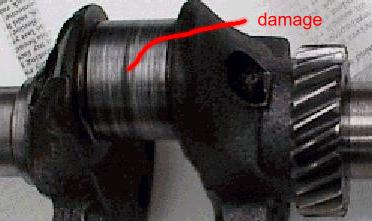
Here is a photo of Gx160 conrod...
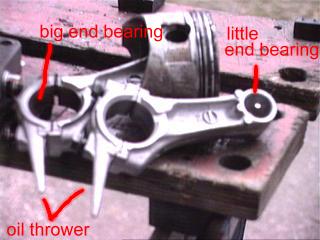
Note the oil thrower, the pointy part of the casting, and the two bearings. The big end of the conrod is coated internally with white metal. This white metal wears out if oil isnt present at all times. If it then runs for much longer it damages the crankshaft, which would then need re grinding for the new bearing surface. This re grind can take the engine outside the specifications/rules of some Prokart racing so check before machining.
Tools needed:
12mm socket spanner
12mm ring spanner
10mm socket spanner
10mm ring spanner
Torque wrench
The steps to replace the con rod, assuming the engine is on the bench and the clutch, petrol tank, exhaust and carburettor are all removed,
Approaching each step in greater detail...
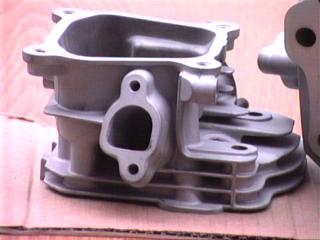
Removing the cylinder head
1) undo 4 bolts on rocker cover and carefully remove rocker cover with joint attached ( 10mm spanners) .
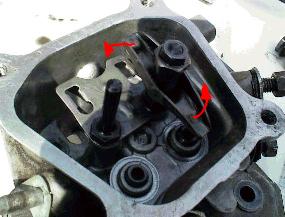
2) flip/rotate the rocker arms off the valves
Lift out the pushrods noting how they slot in the guides. If they are straight they can be re used.
3) carefully remove the rotator from the exhaust valve
4) remove the four long bolts that hold the head to the barrel. If the engine is hot then undo each bolt a little at a time to relieve any stress before fully releasing all bolts.
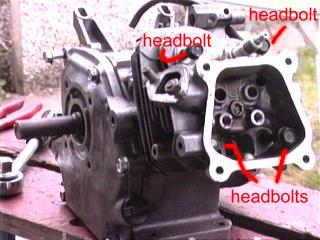
5) lift head and head joint clear of barrel
Draining oil from the crankcase
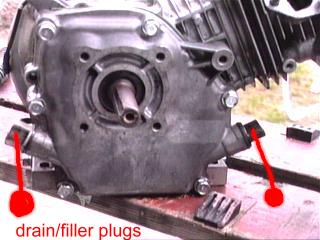
Remove either large plastic drain/filler plug and tilt engine to drain all the oil out of engine. Note colour and thickness of oil. Oil gets dark and thin very quickly but good lubrication needs an oil that feels as if it has slippiness without feeling thin.
Replace drain plug/plugs.
Removing the side of the crankcase
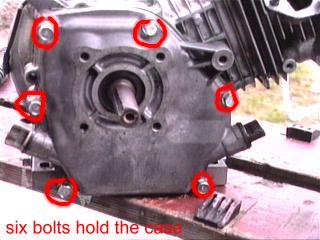
The side is held on with six bolts and these can be slackened a little at a time equally around the joint. A 12mm socket works fine here.
The case side is located on dowels so when removing the case take care how you lever it apart. Take your time and it will part. The joint is fragile but can be re used if it is unbroken.
We can take a quick look at the inside of the casing...
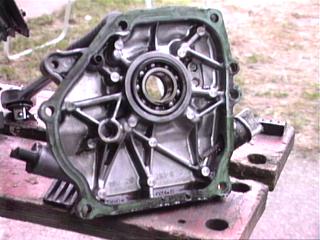
The bearing is visible and the housing for the camshaft gear wheel.
There is an oil seal next to the bearing. This must be lubricated if damage is to be avoided when case is re fitted.
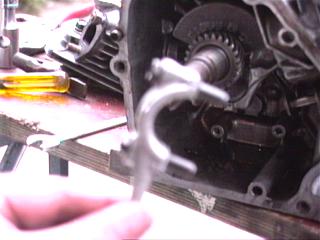
Looking inside the open crankcase we can begin to identify the various parts ...
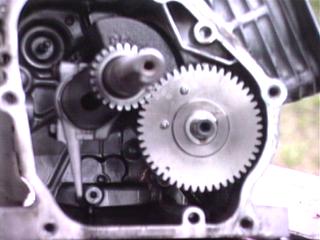
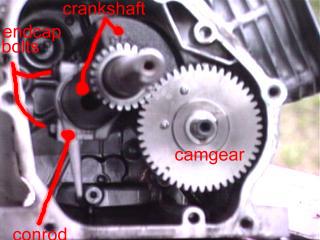
We can see the cam gear, with the centre pop mark (for valve timing, we will cover that later...). This gear is twice the size of its mate. There are two bolts holding the end cap on the con rod. These hold the cap to the upper part of the crankshaft. Rotating the crankshaft, by using the fan, will allow us to see the action of the parts within the crankcase.
As the crankshaft turns it pulls and pushes the conrod, causing it to mimic the rotation of the crankshaft. This is called the stroke and midway thro each cycle/rotation there are points called top dead centre and bottom dead centre. This TDC and BDC are the terms used to describe the position of the piston during the rotation of the crankshaft.
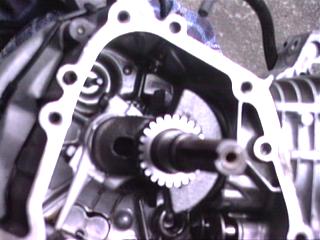
We can now remove the camshaft gear by simply withdrawing it from engagement with its mate, a gear on the crankshaft. Dont worry about timing at this point we will cover that during the assembly process.
When the cam gear is removed we can see the cam followers. They are located up inside the casting and held in compression by the action of the cams as they open and close the valves via the pushrods.

Lets start the actual conrod removal by undoing the two endcap bolts with a 10mm spanner.
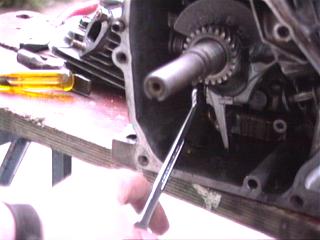
Rotating the crankshaft slightly helps with the bolt removal.
When they are out of the cap gently tap the cap away from the upper part of the conrod.
Examine the endcap for damage to the white metal coating. If it looks worn through or scoured then a new conrod is needed.
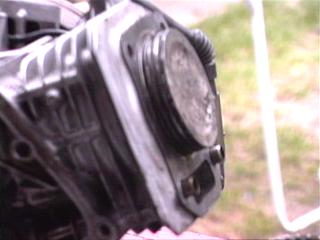
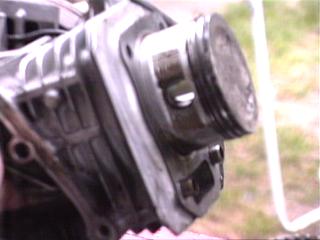
Rotating the crankshaft slowly will push the conrod up the barrel until the crankshaft begins its journey to BDC.
Manually pushing the conrod higher will push the piston out of the barrel.
Support the piston as it exits the barrel to protect the piston rings.

We can also look at the crankshaft for wear/damage. If it looks worn/dull then it will have to be removed and machined to fit a new, undersized conrod.
| *** Please check that machining is allowed in your race rules before any machining is carried out *** |
The piston is removed from the conrod by extracting one of the circlips and pushing the gudgeon pin through the conrod until the piston is free.
This is a good time to refurbish the piston, rings and bore but thats another article...
Fitting the conrod is a process of:
The new conrod will need running in. If it is the only new part it will be ready very quickly. If the crank has been reground it should also run in quite soon. If piston rings have been changed then a correct 'break in' procedure should be followed. There is a full procedure in the Tech Section of UK Karting
The engine should feel smoother and sound quieter with the new conrod. Keep the oil level correct and don't over rev the engine if you want the rod to last!
TORQUE SETTINGS FOR THE GX160 ENGINE
All settings are for new bolts/nuts/studs. Used items are prone to stretching/wear so don't trust them as much as new.
| Part | Pressure in ft-lb. | Feel / Tightness |
| air filter wing nut | 5-7 | nipped, wired |
| carburettor bolts | 6-9 | nipped |
| carburettor bowl | 5-7 | nipped |
| clutch retaining bolt | 13-16 | tight, with slight end float |
| con-rod bearing cap | 8-9 | tight |
| Cylinder head bolts | 16-19 | nipped then tighten diagonals |
| crankcase bolts | 16-19 | nipped in sequence of diagonals |
| exhaust bolts | 6-9 | tight |
| flywheel nut | 51-58 | very tight |
| main jet | 5-7 | nipped |
| rocker box cover | 5-7 | just nipped, equally |
| rocker post | 6-9 | very tight |
| tappet lock nut | 6-9 | tight |
| oil drain bolt | 11-14 | tight |
| fuel tank mounting bolt / nuts | 6-9 | tight |
This article was produced by Brian Pollard, author of "Preparing the Gx160 for 'open' racing" which is available on CDROM, in multimedia format, as an e-book, and in paper form. All enquires should be sent to the above e-mail address.
Now Available!
The UKPollards Gx160 Cylinder Head tuning service. See http://www.ukpollards.com/
or contact Richard by email at richard@ukpollards.com
for more information
| News | Karts & Karting |
Notice Board |
Market Place |
Companies Directory |
Tracks Directory |
Events Calendar |
Race Results |
Photo Gallery |
Links |
Copyright © 1996-2018 UK Karting Comments, Suggestions etc. mail@karting.co.uk |