The TKM clutch is a centrifugal clutch, which engages
at about 6000 rpm. Many karters are unfamiliar with clutches and many drivers
believe that they will reduce performance. The author has found that since
fitting a clutch the practice lap times have not changed, but positions
have improved. The driver explains this as being due to having increased
courage going into contended corners.
1. How the Clutch Works
Figure 1-1 Disengaged Clutch
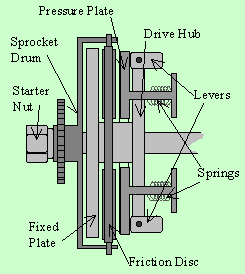
When the engine is at rest or rotating at less than
500 rpm, springs pull the Pressure plate back towards the Drive Hub and away
from the Friction disc.
Figure 1-2 Driving Clutch
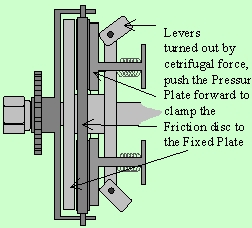
When the engine runs it rotates the Drive Hub, Fixed
Plate and Pressure plate Assembly. The Levers are weighted and have a cam
shaped face, which rests against the Pressure Plate. As the engine accelerates
above 6000 rpm, the levers rotate outwards under centrifugal force so that
the cams force the Pressure Plate against the Friction Disc (clamping the
friction disc between the Pressure Plate and the Fixed Plate). The Friction
Disc drives the Sprocket Drum via the tabs on the circumference of the Friction
Disc, which fit, into the slots in the back of the Sprocket Drum.
2. After each Event
The clutch should be cleaned, checked and the sprocket drum roller bearing re-greased
after each event. This can be done with the engine still mounted in the kart.
- Remove the clutch/coil safety cover and coil assembly.
- Clean all round the engine crankcase and any other dirty bits.
- Prevent the Crankshaft from rotating with the Clutch Holding Tool and remove
the Starter Nut.
- The Sprocket Drum, roller bearing and two Thrust Washers can now be removed.
- Clean the clutch Friction Disc and other components of the Drive Hub assembly
remaining on the Crankshaft, with brake cleaning spray. Take care to avoid
getting cleaner near the Crankshaft Oil Seal.
- Inspect the Sprocket Drum teeth. Check the machined hole that forms the
bearing outer in the Sprocket Drum for damage and lightly grease it with lithium
grease. If the Sprocket is damaged then replace the Sprocket Drum and the
bearing.
- Check the roller bearing and if any doubt replace it.
- Re-assemble the Sprocket Drum and other component.
- Re-assemble the clutch cover and coil.
3. Removing the Clutch
Removing the clutch from the engine is a simple procedure, which does
not require any special skills. It does however require the following special
tools;
-
Clutch Holding Tool, (Special 'C'
spanner - available from TalKo)
-
Clutch Puller, (Special puller from TalKo)
-
Torque Wrench (2.5lbs - 45lbs)
-
24mm Ring Spanner.
The clutch can be removed whilst the engine is mounted in the kart, but it
is easier to work with the engine on a bench.
- Remove the Sprocket Drum, Thrust Washers and Bearing.
- Prevent the Crankshaft from rotating by holding the clutch with the special
Clutch Holding Tool and remove the large securing nut using a 24mm ring spanner.
Remove the coned safety washer.
- Using the special Clutch Puller, remove the Drive Hub Assembly. It should
come of the tapered shaft with a crack! If it does not come free try tapping
(very carefully!) the head of the jacking bolt with a steel hammer.
- Lift out the Woodruff key from the crankshaft. Push one end in and the other
will rise out.
- Clean and check the crank shaft for damage. Lightly grease the shaft to
protect it from rust.
- Whilst the Clutch is removed it is a good opportunity to check that the
Crankshaft oil seal looks OK
4. Dismantling the Drive Hub Assembly
[Figure 4-1] The Drive Hub Assembly
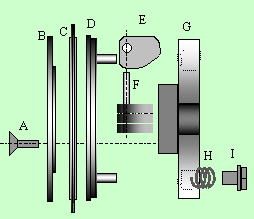
|
A
|
Three counter sink hex' socket screws which secure the Fixed Plate
(B) to the Drive Hub (G).
|
|
B
|
Fixed Plate.
|
|
C
|
Friction Disc.
|
|
D
|
Pressure Plate.
|
|
E
|
3 x sets of three Levers.
|
|
F
|
3 x Dowel Pins.
|
|
G
|
Drive Hub.
|
|
H
|
3 x Pressure Plate Springs.
|
|
I
|
3 x Spring Retainer Nuts.
|
- Remove the three socket head, counter-sunk screws (A) which secure the Fixed
Plate to the drive hub. They should not be tight.
- Hold the Drive Hub Assembly with the Clutch Holding Tool and loosen the
three Spring Retaining Nuts. - Remove all three nuts (I) together, one turn
at a time.
- The components of the Drive Hub assembly can now be separated.
5. Check and Clean the Components
Clean all of the clutch components using spray Brake Cleaner. (This will
remove all grease from the roller bearing!)
- Inspect the Sprocket Drum and Bearing.
- Measure and record the thickness of the Friction Disc. This will give a
means of predicting when the Friction Disc will need replacing. The minimum
thickness is specified in the TKM Regulations as 2.90mm.
- Remove and inspect the three Dowel Pins. If any wear, scoring or damage
is visible them replace all three pins. Because the Dowel Pins are highly
stressed they should be replaced whenever the Friction Disc requires replacement.
- Separate the 9 Levers and check them for damage. Moisture often gets trapped
between them causing rust. Check the pivot holes for wear and elongation due
to stress. If you have any doubts then replace them.
- Check the Friction Disc tabs for cracking.
- Check that the free length of the Pressure Plate Springs exceeds 12mm. If
not then replace them.
- Check and clean all other components.
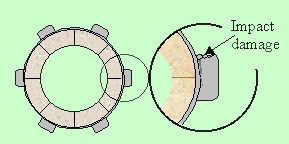
5.1 Checking the Friction Plate
Remove the friction plate and inspect it for impact damage and cracking.
Figure 6.5-1 Impact Damage
6. Reassembling the Drive Hub
Ensure that all parts of the clutch are clean and that minimum amounts of grease
are used. Under no account allow grease, oil, WD40 or any similar contaminant
onto the Friction Disc or the ground surfaces of the Pressure Plate and Fixed
Plate.
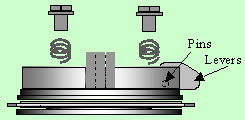
- Place the Drive Hub down with the Dowel slots facing up. Lightly grease
the Dowel Pins and the Dowel Pin slots withanti-seize copper-slip. Assemble
the Pins and Levers into the Drive Hub. They will just drop into place.
Figure 6-1 Pins and Levers in place
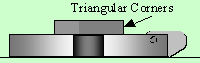
- Apply a small amount of copper slip to the triangular corners to ensure
that the Pressure Plate will move freely on the Drive Hub. Place the Pressure
Plate over the Drive Hub and Lever assemblies. Ensure that the studs are correctly
engaged and wipe off any excess grease.
-
Holding the Drive Hub, lift the assembly, ensuring that
the Pressure Plate falls fully into place, turn the assembly over and place
it down onto the Friction Disc and Fixed Plate, so that the Pressure Plate
studs are held up proud of the Drive Hub.
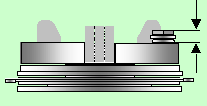
Figure 6-2 Springs and Retaining Nuts
- Apply Blue Loctite to the Pressure Plate Studs. Place the three springs
over the studs and screw on each of the spring retaining nuts, by just a turn
(They will be tightened later).
- Turn the assembly over and apply a small amount of copper-slip to the three
countersink screws. Screw in the three countersink Fixed Plate securing screws.
These should not be tightened, but just lightly touched home. They will not
come out because the Large Coned Safety Washer will hold them in place.
- Turn the assemble over and hold the Drive Hub with the Clutch Holding Tool.
Tighten the Spring Retaining Nuts down to about 2-1/2 lbs./ft
- If you have changed any components then check the height of the Spring Retaining
Nut as required by the fiche. (Item 4 in the clutch fiche.)
Figure 6-3 Checking the Spring Retension Nut Height
7. Re-fitting the Clutch
- Ensure that the Crankshaft is clean and very lightly greased. Replace the
Woodruff Key into the Crankshaft and install the Drive Hub assembly. Ensure
that it is well seated on to the tapered part of the Crankshaft. (Note that
the Woodruff key is not the same as for the non-clutch Crankshaft. The clutch
keyway is 3mm wide and the non-clutch keyway is 2.5mm wide.)
- Install the Coned Safety Washer with the dome facing outwards. Install the
large clutch retention nut.
[Figure 7-1] Coned Safety Washer
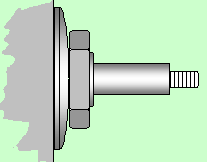
- The nut needs to be tightened to 45 lbs./ft. Use the Clutch Holding Tool.
- Lightly grease the Internal Thrust Washer and place it onto the crankshaft
with the inner radiused edge facing inward.
- Apply a small amount of lithium grease to the part of the Crankshaft that
forms the bearing inner and slightly more grease to the bearing itself before
installing it.
- Install the Sprocket Drum. Ensure that the tabs on the Friction Disc are
correctly inserted into the slots on the peripheral of the Sprocket Drum.
- Lightly grease the small Thrust Washer and place it onto the crankshaft
with the inner radiused edge facing inward.
Figure [7-2] Sprocket Drum & Bearing

- As the Starter Nut is tightened to 15lbs/ft keep checking the Sprocket Drum
free play. If it becomes clamped then stop and locate the problem.
If you tighten
the starter nut with the Sprocket Drum slots not engaged with the Friction Disc
tabs so that the Sprocket Drum is pressing on the Friction Disc tabs then you
might crack the Friction Disc.
- The Sprocket Drum should move freely in and out along the crankshaft with
about 0.3 mm of free-play. If it does not, then check the orientation and
size of the thrust washers [6.8].
9. Sprocket Drum Clearance
If you have not changed the Sprocket Drum or the Thrust Washers then the
Sprocket Drum clearance should be OK. If the end float is much less than expected
then you have assembled it incorrectly! To measure the Sprocket Drum clearance,
use a feeler gauge. Check the free play and adjust it by changing the thickness
of the Internal Thrust Washer.
This article was produced by Chris Compton, author of "A Practical
Mechanic’s Guide to TKM Karting " which is available from www.kart-nuts.co.uk
| Tech Tips
& Info |
| UK Karting
Main Index |